- There is a new trend in town, and that is painted arches
- Painted arches can help with enhancing the look of your house
- The steps to create one is easy, and you’ll learn everything from this article
When we were younger, we used to have the itch to draw on walls. Well, we were no painters, but something about clean walls just seemed to make us go, “Wow, this wall looks like it needs some colours.” Honestly, you were probably right, but our parents had different opinions, and we know that because of the many times we got scolded for “ruining” the walls.
Fast forward to many years later, and adults are coming up with trends that require you to grab a brush and paint only a small area of the chosen wall in your home? Yes, call up your mom and tell her that the 2-year-old you were just practising for this particular day- the day where it’s no longer a crime to draw something on a wall.
Recently, painted arches have been one of those things that home decor enthusiasts are excited about. Essentially, painted arches are the modern version of an accent wall; it is a creative way to add a splash of colour to a room, and it appears to be fresher than painting an entire wall. Plus, this requires less paint, creates less mess than rolling out an entire wall, and is less stressful than wallpaper. Guess we’re already winning, right?
If you wish to attempt this trend, here’s what you have to do.
How to create your own

Before you begin with any DIY projects, it’s best to gather all the necessary tools. When creating your own painted arches, these are what you need:
- proper gear for your painting project ( gloves, goggles, etc.)
- painters tape
- a piece of drape to cover your floor
- level
- string
- scissors
- pencil
- hammer
- nail
- the paint of your choice
- paintbrush
- small roll
So when you’re ready to get the job done, you have to carefully decide on the shape of the arch and where you want the arch to be. Being mindful of the placement of your arch is crucial because this arch serves the purpose of enhancing the look of your house. You do you, girly! You’re not drawing and painting them on your originally white wall just because you’re bored, but if that’s what you’re going for, we’re not gonna stop you.
Unless if you intend on making it part of the arch. First of all, using a damp cloth, remove any remaining dirt off your wall, then remove any objects that may disturb the process of tracing or painting your arch. Once that’s sorted out, lay down a drop cloth to protect your floor from spills.
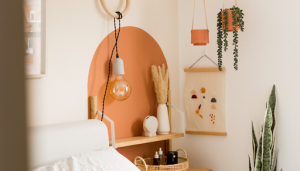
When the prepping is all done, you can go ahead and trace your arch shape onto the wall. Fret not, @sarah.m.amos Instagram stories are great at explaining how you can get the job done correctly. The tricky part here is to create the perfect rounded arch shape on top. Simply put, attach one end of the string to the midpoint of your circle and the other to your pencil to make the rounded semi-circle shape at the top of your arch (the length of the string will determine how big the arch is). Then, pull the thread tight and trace the outline onto the wall.
Being well aware of our limitations in guiding you to get the best results, we’ve asked for some help from DIYwithElle. Check out her informative video of painted arches while we tell you more about why we’re in love with this trend.
1/ Enhance Your Entryway
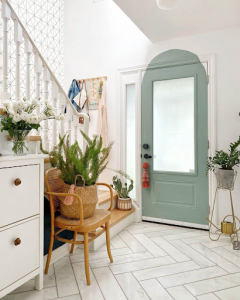
As mentioned earlier, your newly painted arches will add a touch of “magic” to your cosy little nest. If you’re unsure where to paint those arches of yours, consider doing it on your door. By doing so, you’re going to trick your guests’ into feeling like you have a taller space. You didn’t do anything much but adding an arch just above the frame of your door. A quick tip for you: if your door is painted in a lighter colour, it’s best if your arch is painted in a colour that’s darker than your door.
2/ No Headboard? No problem

A bulky headboard is probably a thing of the past, but if you still wish to have one, maybe it’s best not to go for the traditional brass or wrought iron. Instead, paint several arches behind your bed in contrasting colours. However, if you’re not a fan of colours, you can still opt for the same design but using only one colour of your choice.
Have fun painting arches!
The arch you draw must be clean and neat— you’ll want to take your time and properly think out your strategy before picking up that paintbrush. If you’re not confident of your amateur painting skills, feel free to use a small sponge brush to paint the outline. The key here is not to rush the process. Take your time, and the results will be more than satisfactory.
However, if you mind yourself not satisfied with how it looks after painting, don’t worry because you still have a chance to redo it to perfection. Painted arches are a fun and quick way to liven up your area, so don’t get too caught up in getting it perfect the first time.
In a nutshell, this new trend makes it easy to add effect and style to your home without having to pick up a hammer or pay for expensive crown moulding. It’s the easiest way to transform your space with just a little paint. All you have to do is get started and don’t forget to enjoy the process.
